Rapid Game Builder

    • A Dash of Game Development
    • About
    • Contact
Illustration of a bird flying.
  • A Dash of Game Development – 10. Game Objects.

    What are game objects? Simply put, they are the entities that make up your game. A character in a game, a tree which is a part of the game landscape, buildings, walls, sprites, menus, the HUD, platforms, NPCs  and mostly everything that you see within a game are all examples of game objects. It would be fair to say that everything and anything you observe within a game is a, or is a part of a game object. But what about things that you can’t see? What about sound sources within a game that produce sound? The sound coming off a running stream, or off a exploding mine, or off a moving car — can they also be modeled as game objects? Yes indeed they can be. In fact there are also game objects that you can’t see or hear — for example, a trigger that makes a land-mine go off, or a proximity-switch that opens a door when your character stand near it — are are all examples of game objects. If we look at our previous examples, the sprites that we used for our simulations could be considered as game objects. In simple terms a game object is an entity within a game that takes part, directly or indirectly, in the process of the game simulation. A game object could (but not always) have behavior and properties modeled into it to fulfill a specific purpose within the game world. Game objects can and do directly interact and participate in the gameplay. An example of interactive game objects could be enemy NPCs that attack your character while he/she is completing a quest. Such objects directly interact with the gameplay. Other game objects may not interact at all with the gameplay, but are there to serve some other purpose. Game objects like trees, shrubs, grass that litter a vast game landscape may not be direct participants in a game, but are there to serve a different purpose — that of creating a believable landscape within a game.

    Having understood what game objects are, let’s see how we can add game objects to our framework. At a very basic level, most game engines have some sort of a top level GameObject class. They may be called different things — “GameEntity”, “Actors”, “CoreObject” or some other name you could think of, but mostly they serve the same purpose. A GameObject class or interface is usually an abstraction for the most basic object related functions. There are many ways you could model such game objects. The simplest that one can think of is obviously a class design based on inheritance. In an inheritance based design, you have an interface or a base class called GameObject and all your specialized game objects classes derive from this base class/interface, each adding it’s own specialized functionality. This is the traditional way of designing a game object class — and many game engines still use this method. However this design has a several issues. A game can have tens if not hundreds of types of classes, and there are situations when an inheritance based approach quickly becomes complicated and unmanageable. There are often situations where the characteristics of two distinctly separate game objects overlap even though they are hierarchically dissimilar. Considerer two GameObjects, a Bird and a SpaceShip — both can fly, but based on your design the two could be modeled differently. At the very least you may have to duplicate parts of the flying code for both objects and maybe other pieces of code that are directly or indirectly related to flying.

    There are also instances where objects can’t be correctly classified via an inheritance based approach because many game objects just can’t be classified in a rigid inheritance hierarchy. Consider a situation where an object can be classified as two different types of objects — for example, you make all the Buildings in your game as static indestructible objects. You do this by creating a class called Building which derives from the class IndestructibleObject.  However later in your game you may want one of the building to blow up. To solve this you would either have to make changes to your Building class so that it has the ability to destruct and blow up — or you will have to create a new class called DestructibleBuilding. There are problems with both scenarios. Making the Building class destructible will mean all your buildings will be destructible — which may not be what you wanted in the first place. The second and the more plausible option is to create a derived class called DestructibleBuilding and derive it from a DestructibleObject to make it destructible. However even with this approach you will find that there are problems. A destructible building may be 99% similar to all other buildings, but since you made a new class and derived it from a DestructibleObject, you will have to duplicate most of the code used in the original Building class. Duplicating code is just not the right way to go — is it? Well, some would argue that you could use multiple inheritance — derive the DestructibleBuilding from both the Building and DestructibleObject classes. Well, the original Building class is a IndestructibleObject and since an inheritance relationship is a “is a” relationship, a DestructibleBuilding can’t be both a DestructibleObject and an IndestructibleObject — that’s just plain absurd, not to mention that it may also cause a “diamond of death” in your hierarchy. If you are making such choices in your design, it’s time to pause and introspect, because this is a classic case of “shooting yourself in the foot”.
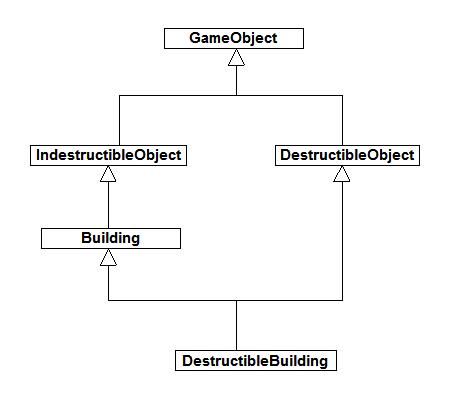
    Problems with Inheritance
    10.1 Problems with Inheritance

    As you can see inheritance makes object design rigid. There are situations when this is desired, however in the case of our game objects this might not be the ideal solution. So what other alternatives do we have besides an obvious inheritance approach? The other way of approaching the game object problem is via composition. Instead of having separate classes for each kind of game object, we have a single GameObject class and build our game objects by giving them properties and defining behavior. This will allow us more flexibility since object properties and behaviors are decoupled from the class implementation. Taking the previous example, any Building in the game just becomes an instance of class GameObject instead of a separate class derived from GameObject. Since we are not modeling behaviors or properties via class inheritance, there will be no class called DestructibleObject, since Destructible is now a property and needs to be modeled separately. Properties have no direct dependency with the GameObject class. A GameObject is associated with property class via a more loose “has a” relationship. For a Building that we intend to make destructible we simply assign it a property called Destructible. In fact, once created the Destructible property can be assigned to any game object. So is the case with any other property that we create. Fig. 10.2 shows this more clearly.
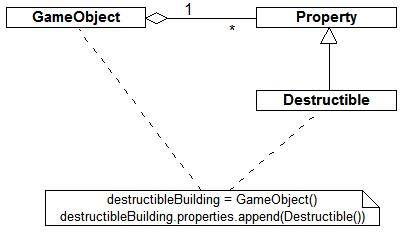
    10.2 GameObject and Properties composition
    10.2 GameObject and Properties composition

    Properties by themselves only define a GameObject. They are used to create an object, but they by themselves don’t do anything. In our example, the Destructible property doesn’t make the Building explode. It only tells anyone who is interested — “yes, this Building can explode”. We will obviously need to have something that will make the Building explode when it sees the Destructible property — and when the time is right, for example — a missile hitting the building. That’s were behaviors and conditions come in. We will talk about behavior and conditions in more detail in a separate chapter where we will see how to model behaviors and combine them to give us the desired behavior for an object. For now we will focus on GameObject creation. It’s easier to just think of an object as a instance of a GameObject with a collection of Properties. This may appear confusing at first, but later you will see the benefits of this approach.

    We covered quite a bit of theory in this chapter, but it was necessary in light of things to come. We will end this chapter here and look at game object creation in the next.

    July 20, 2011
  • A Dash of Game Development – 9. Archives and Resource Groups.

    In this chapter we take the basic resource management framework we built in the last chapter and add a few more things to it. We will refine our code and make the framework more generic so we can read resources from archives and allow loading of resources via resource groups. (This will allow us to make our framework more data-driven in later chapters.) Let’s first begin by looking at what an archive is and where it fits in our framework. In it’s simplest form, an archive is a collection of files. In our case the files are resource files that are loaded and shared between game entities. If you consider our directory structure, the res folder could be considered as an archive since it contains all our resource files. Most games will often pack such files into single file called an archive file, or sometimes into a set of separate archive files for each kind of resource (images, sounds, etc). Archive files are not to be confused with simple binary files. Archive files maintain a directory structure and also contain metadata along with other information, and can (optionally) store data in a compressed format. You may have come across the terms “zip archive” or “rar archive” — they are in fact compressed archives.

    We will first start off with our uncompressed res folder as an archive and build archive support into our framework. At the same time however, we will keep our design flexible enough to add support for compressed archives. So, let’s see how you can create a basic archive class.

    class Archive():
        '''Manages the loading of the resources from a archive.'''
    
        def __init__(self,  archivePath):
            '''Creates an archive object. Note the archive is not loaded or created.'''
            self.path = archivePath
    
        def Load(self):
            '''Loads the archive.'''
    
        def Unload(self):
            '''Unloads the archive'''
    
        def Open(self, fileName, mode='r'):
            '''Opens the archive file for access. The function returns a file type object.'''
    
        def GetSize(self, fileName):
            '''Returns the size in bytes of the file inside the archive.'''
    

    The Load function loads an archive. In case of a folder this function will probably do nothing except check for the existence of the archive path. For compressed/single file archives, this function will load the archive file. The Open function opens a file inside the archive and returns a Python file type object. You can read the contents of the file inside the archive via this object. If you recollect from the previous chapter, our ResourceManager’s LoadResource function should call the Open function of the archive since that is the place where resource loading takes place. For our FolderArchive the code should be —

    class FolderArchive(Archive):
        '''Manages the loading of the resources from the disk drive folder.'''
    
        def Load(self):
            '''Loads the archive.'''
            if os.path.exists(self.path) == False:
                return False
    
        def Open(self, fileName, mode='rb'):
            '''Opens the archive file for access. The function returns a file type object.'''
            f = open(self.path + fileName, mode)
            return f
    
        def GetSize(self, fileName):
            ''' Returns the size in bytes of the file inside the archive.'''
            return os.path.getsize(self.path + fileName)
    

    Pointing the FolderArchive class to the res folder allows the class to load the files under that folder. However we still would have to use a relative path to our resource if we wanted to load our files. If you recollect, we used relative file paths in the previous chapter for our resources. I find that kinda unintuitive. Imagine names like ‘../res/images/squares.png’ everywhere in your code. That’s just doesn’t look right. An ideal solution would be to defer the relative paths to the resource system. Once initiated with the correct path, you are free to use the resource names directly within your code. Well that’s pretty easy to do — we just have add a small function to our ResourceManager code –

    def SetSubPath(self, archivePath):
        '''Sets a path (folder) inside the archive realtive to the archive root where
        the manager searches for resources.'''
        self.__archivePath = archivePath
    

    Our archive already points to the res folder, so the relative path (subpath) of the manager will be ‘images/’. The code for both the archive and the manager should look something like this –

    # create a FolderArchive pointing it to our resources.
    archive = FolderArchive('../res/')
    
    # create a resource manager for images.
    self.imgResMan = ImageResouceManager()
    
    # set the sub-path where our images are located relative the the archive.
    self.imgResMan.SetSubPath('images/')
    

    This should allow us to point our resource manager to the correct folder and directly use resources using their resource names. This however, doesn’t solve the problem with resource loading. In the previous chapter we passed a list of resources to the Cache function of the ImageResource manager, and we did that  in the Init function of the GameManager. That’s not quite the correct way. Games require hundreds of resources and you can’t possibly pollute the GameManager class with names of all the resources required. In fact in trying to solve one problem we created another — that of resource loading.

    What we need to do is allow each sprite class to request the resources it needs and then make the ResourceManager cache all the requested resources. To do that, we introduce a new class called ResourceGroup. A ResourceGroup, as it’s names suggests, is a set of resources names that are passed to the ResourceManager’s Cache function. At it’s heart is a set (unordered list of unique names), which contains the resource names that we want the ResourceManager to cache. The flow goes something like this — after the creation of each sprite, the GameManager allows each of the sprites to request the resources it needs by appending their names to the resource group. The resources are cached by the ResourceManager and  after doing that, the Create function of the each individual sprite is called. The ResourceGroup code is something like this —

    class ResourceGroup():
        '''This class is used to tell the ResourceManager which batches of
        resources need to be cached.'''
    
        def __init__(self, archive, name=''):
            '''Construct a resource group with a name.'''
            self.archive = archive
            self.resourceNames = set()
            self.name = name
    
        def __iadd__(self, resource):
            '''Adds a resource to the group.'''
            self.resourceNames.add(resource)
            return self
    
        def __isub__(self, resource):
            '''Removes a resource from the group.'''
            self.resourceNames.remove(resource)
            return self
    
        def Clear(self):
            '''Removes all the resources from the group.'''
            self.resourceNames[:] = []
    

    The flow for the Init function of the GameManager is —

    def Init(self):
        ....
        ....
        # create a FolderArchive pointing it to our resources.
        archive = resmgr.FolderArchive('../res/')
    
        # create a resource manager for images.
        self.imgResMan = resmgr.ImageResouceManager()
    
        # create a resource group for images
        imgResGroup = resmgr.ResourceGroup(archive)
    
        # create our sprites.
        self.sprites = []
        self.sprites.append(gamesprites.SquareSprite());
        ....
    
        # load the archive.
        archive.Load()
    
        # set the sub-path where our images are located relative the the archive.
        self.imgResMan.SetSubPath('images/')
    
        for sprite in self.sprites :
            # call Setup on our sprites and pass the resource group to the sprites
            # allowing them to request their resources.
            sprite.Setup(imgResGroup)
    
        # cache the requested image resources.
        self.imgResMan.Cache(imgResGroup)
    
        for sprite in self.sprites :
            # call Create on our sprites.
            sprite.Create(self.imgResMan)
            # attach the draw handler to our drawEvent.
    

    I have added  a Setup function  to the sprite class and where the name of the resource is appended.

    class SquareSprite(GameSprite):
    
        def Setup(self, resGroup):
            resGroup += 'squares.png'
    
        def Create(self,mgr):
            img = mgr['squares.png']
            self.sprite = sf.Sprite(img)
            self.sprite.SetPosition(100.0, 10.0)
    

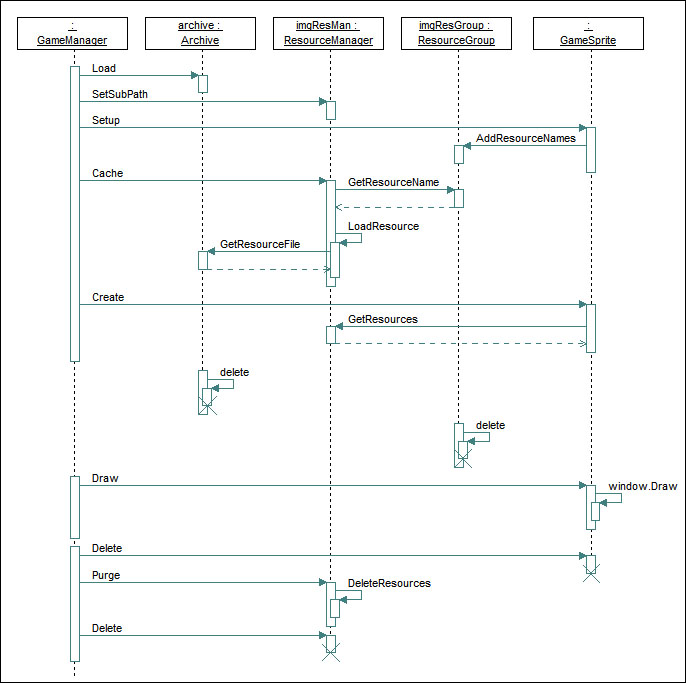
    The entire flow of the resource system can seem a bit complicated and that’s why I have included a sequence diagram of the process I explained above. (Click on the fig to enlarge.)

    Sequence diagram for the Resource Framework.
    9.1 Resource Framework Sequence Diagram.

    If you find this a bit confusing at a first read, step through the code via a debugger and try and see what happens where. You can try loading additional images and adding a few other sprites just to get the hang of things. If you look at the code for this chapter, I have made subtle changes to included exceptions to correctly handle error conditions. That’s in accordance with standard Python practices. I hope there will no trouble understanding the use of exceptions and what role they play within our framework. I have also added support for a compressed zip archive (ZipArchive), which is a drop in replacement for our FolderArchive. You can experiment with that too.

    We have now our resource system in place. We will be using this system in all our later chapters. In the next chapter we take a look a something which everyone has been patiently waiting for — Game Entities and Objects. From then on, we will build upon this framework and go on to advanced topics like transformations, collisions, graphs, render passes, collections, GUIs and finally put all of this into a small working game.

    Downloads

    • dash_ch9.zip
    February 16, 2011
  • A Dash of Game Development – 8. Resource Management.

    In the last chapter we used and shared an image resource between sprites, now we will see how we manage shared resources within our framework. It’s easy to manage a shared resource when you have a single image and handful of sprites using the same image. However, games have a lot of images and even more sprites sharing those images. A lot of entities load and use sprites all over the place, and a naive way to load and use them like we did in the previous chapter would lead to a chaos in our code. Keeping track of  shared resources would become a nightmare. Besides, images aren’t the only resources a game has. There are sounds, music, scripts, particle effects, shaders and a game can have even more resource categories, all of which are usually shared. Wouldn’t it be great if we could some how defer the management of resources to an automated class in our framework? A class that keeps track of the resources loaded and disallows multiple loads of the same resource would be an ideal solution. Well, lets see how that can be done.

    Wait! Before we jump into the code, let’s first understand how resources in our game project will be organized. Understanding the organization is crutial to understand resource management. Almost always all game resources are  The topmost folder of our project is the game folder, which currently has 3 child folders doc, res and src. The src folder holds our source code, the doc holds the documents and the res folder holds the resources. All our resources are currently placed int the res folder under the main game folder (fig 8.1). Each folder can have sub-folders which further facilitate categorization and organization. In our case the res folder will have child folders for each category of resources (images, sounds, partfx, etc). We will refer to this structure all throughout this chapter. Most games will have a similar organization structure [1].

    Organization
    8.1 Organization.

    So, now let’s look at the code –

    class ResourceManager():
        '''Does the resource management for the game.'''
    
        def __init__(self):
            '''Constructor for the Resource Manager.'''
            self.__resources = dict()
    
        def Cache(self, resourceList):
            '''Loads all the resources into the manager.'''
    
        def Purge(self):
            '''Deletes and removes all the resources from the manager.'''
    
        def __getitem__(self, resourceName):
            '''Returns an image from archive. If an image is not loaded, it throws and exeption.'''
            return self.__resources[resourceName]
    

    Central to the resource management is a class we will call the ResourceManager. It’s the base class for several resource managers we will eventually write. At it’s heart is a dictionary (__resources) for resources, which is an associative array of resource names as keys and actual resource objects as values. The resources can be accessed directly using resource names via the [] (__getitem__) operator. The resource manager has 2 other functions — the Cache function which caches all the resources into the manager by loading them from a resourceList, and the Purge function which deletes all the resources loaded by the manager. We will have different resource managers for different resources as we go along, so to make the Cache function more generic we add another function to the manager code to load resources and call it inside the Cache function.

        def Cache(self, resourceList):
            '''Loads all the resources from the list into the manager.'''
            for resourceName in resourceList:
                res = self.LoadResource(resourceName)
                if res != None:
                    self.__resources[resourceName] = res
    
        def LoadResource(self, resourceName):
            '''Loads a resource. (Implemented in child classes)'''
            pass
    

    Our ResourceManager template is ready. Since we are already familiar with image resources, we will first begin with the ImageResourceManager — which manages image resources. Let’s see how it’s  LoadResource function will look like.

    class ImageResouceManager(ResourceManager):
        '''Manages Image resources.'''
    
        def LoadResource(self, resourceName):
            '''Loads an image.'''
            img = sf.Image()
            img.LoadFromFile(resourceName)
            return img
    

    If you recall, this is the same code we used to load our images in the previous chapter — and that’s about it! The way to use the manager is simple.

    def Init(self):
    ....
        # create a resource manager for images.
        self.imgResMan = ImageResouceManager()
    
        # cache our image resources.
        self.imgResMan.Cache(['../res/images/squares.png', '../res/images/crate.jpg'])
    ...
    #later in our code
        image = self.imgResMan['../res/images/squares.png']
    

    The code above creates the manager and caches the images in it. To access the images, you can simply call the [] operator on the manager and pass it the resource name. To further illustrate how the resource manager is used, I have created a file called gamesprites.py found in the zip file below. In the file you have a few sprite objects. The Create function of the sprites should give you a clear idea on how the resource manager will be used in our game. The Init function of the GameManager creates the ImageResourceManager and caches the resources in it. It then passes the manager to the Create function of each individual sprite object where it is used by the sprites to create themselves. The OnDraw functions of the sprites are connected to the drawEvent which is fired from DrawEntities function of GameManager. The manager is finally used to Purge the resources loaded and is itself destroyed in the Cleanup function thus freeing the resources.

    We have created and used our first resource manager. Resource management can be a complicated topic in game engines and it’s important to understand how resources are managed within any kind of game framework. I would say it’s one of the most important things for advanced games that use gigabytes of resources, especially on memory limited environments like game consoles. For now, I have purposefully kept our resource manager simple. We want to understand the  function of the resource manager and not overly complicate it right from the word go. In the next chapter we will extend the resource manager to handle archives and resource groups.

    The last thing we will touch upon in this chapter is the logging system. A logging system is crucial for any game. It’s can be the only savior when things go wrong and the debugger isn’t available — for example, when your game crashes on the player’s machine. Without logging there is no real way to troubleshoot in such situations. We must therefore, have a logging system for our framework. Since Python already has a logging system built-in, we use the same for our game. I will not be explaining the logging system since it’s already clearly explained in the Python documentation (15.7). The logging system can be found in the log.py file.

    Downloads:

    • dash_ch8.zip

    [1] When a team work on a software project, the organization structure of a project is generally closely tied with some kind of a version control system. This allows multiple people to work within the project and facilitates project management.

    February 7, 2011
  • A Dash of Game Development – 7. Images, Sprites and Textures.

    We will be looking at a bit of theory again in this chapter. First let’s start with images. An image is often used interchangeably with the terms picture and bitmap. If you recall, we talked about bitmaps in chapter 4 — where we understood what a bitmap was. Images are usually stored on a storage medium in an Image File. An image file has image data which is stored in a standardized format called image format. An image format is a specification that defines how image data should be arranged and  formatted so that it can be universally read. In in our case it’s SFML that reads all the images. It’s tempting to think images as bitmaps, however not all image formats store data in pixels. Some formats store data in vector graphics format. We won’t be getting into vector graphics images in this series since it’s out of scope for a simple python based game like ours. All the images we will be using will have raster graphics i.e. pixel data — but it’s important to understand the difference and stop thinking images as only bitmaps [1]. For the remainder of this chapter I will only talk about raster graphic images, i.e. bitmap image formats.

    Along with storing data, an image format also specifies how the image data is compressed. If you go through the specs of most formats, you will see that they usually have compressed data. That brings us to the question, why should an image be compressed? That’s because without compression an image file would become huge very quickly [2].  A true color image having a alpha channel requires 4 bytes per pixel. So the size of a relatively small image of 1024 by 1024 pixels would become 1024 x 1024 x 4 = 4,194,304 bytes or 4 MB. With compression applied, this size can be brought down significantly. Smaller files are faster to read off the disk and easier to transfer and maintain. But does compression degrade the image data? The answer is — it depends on what image format you use. There are two types of image compression algorithms that are in use, there are  the lossy compression algorithms and the lossless compression algorithms. Lossy compression algorithms produce significantly smaller image files at the cost of some decrease in image quality, whereas lossless compressions preserve the quality of the image but produce image files that are a a bit larger than lossy algorithms, but still smaller than uncompressed images. The JPEG family (.jpg, .jpeg, etc) file formats use lossy  compression algorithms whereas the PNG format is a lossless image format. Since our game will be a standalone single player game, we will mostly use the PNG format. The PNG format gives a pretty decent compression ratio and allows us to maintain our images in lossless quality. The image format is also a free image format and is supported by SFML.

    That was a bit of a long lesson we went through there so now let’s try and see how we handle images in our game. Images are resources — remember resources from chapter 3? Since they are external files, they need to be loaded before we can use them inside our game. SFML takes care of loading images for us and is quite simple to do. We will be using the file squares.png shown in 7.1. The file is a 128 pixels x 128 pixels in size.

    squares
    7.1 The squares.png image

    The code for loading the file is.

    img = sf.Image()
    img.LoadFromFile('squares.png')
    

    That was easy, but wait, how do we display our image? Well, as I said above, an image is a resource and we must map our resource to a drawable entity before it can be displayed in our view. In SFML terms a drawable entity having an image is called Sprite. In classical game development terms a sprite is usually a 2 dimensional image or an animation which forms a part of the game screen. Several small sprites are integrated, often seamlessly within a game to build a game world. A sprite is a drawable entity, that is often, but not always rectangular. In SFML it’s very easy to create and draw a sprite. Let’s see how it’s done using the image we loaded above.

    squaresSprite = sf.Sprite(img)
    ...
    ...
    #In our game loop
        window.Draw(squaresSprite)
    ...
    ...
    

    The above code will display the entire squares.png in our view. But what if we want only part of our image? Say for instance — what if we wanted only the red square? Can we get a part of our image into a sprite? Yes we can. It can be done by setting a sub-rectangle in our sprite. Let’s look at the following piece of code –

    redSprite = sf.Sprite(img)
    redSprite.SetSubRect(sf.IntRect(65, 0, 128, 64))
    

    What  does this code do? It sets the co-ordinates of the internal rectangle of the sprite to use only a portion of our image while drawing. Just like we have co-ordinates for the Screen and our View (as we saw in chapter4), our images can also be addressed with the help of co-ordinates — and just like our screen and view our images also have co-ordinate axes. In our code the SetSubRect sets the sub-rectangle to left (x1) = 65pixels, top (y1) = 0 pixels, right (x2) = 128 pixels and bottom (y2) = 64 pixels, which represents the red portion of our image.

    Image co-ordinates
    7.2 Image co-ordinates.

    There is one question you might ask — Why was a sf.Image() needed? Wouldn’t it have been easy just to load the entire image into a sprite and then draw it? Why do we need an intermediate resource? That’s because, resources are shared. What would happen if we wanted to use 4 sprites that use the same image? Say if we wanted yellow, red, blue and green sprites. We would have had to load the image 4 times, once for each sprite. A terrible waste of memory. Instead of that we load the image only once and create multiple sprites using sub-rects from the same image. When images are loaded, they have to be decompressed and loaded as bitmaps — and we saw how large raw bitmaps can be. It would be unwise for us to load the image 4 more times for 4 other sprites that use the same image. Instead we share the image between sprites.

    yellowSprite = sf.Sprite(img)
    yellowSprite.SetSubRect(sf.IntRect(0, 0, 64, 64))
    
    redSprite = sf.Sprite(img)
    redSprite.SetSubRect(sf.IntRect(65, 0, 128, 64))
    
    blueSprite = sf.Sprite(img)
    blueSprite.SetSubRect(sf.IntRect(65, 65, 128, 128))
    
    greenSprite = sf.Sprite(img)
    greenSprite.SetSubRect(sf.IntRect(0, 65, 64, 128))
    

    This is how resource sharing takes place. Always strive to share resources between game entities. If you have a lot of small sprites, it’s always wise to bunch them up together in one image. There are two advantages to that — a) You will need less image loads (which will be fast) and also require less memory — and b) Graphics rendering hardware is optimized for drawing large batches of entities. When there are a lot of sprites that use the same image, the drawing can be bunched up into one large batch and drawn in a single instance. That increases rendering speed. We will see this later in chapters related to optimizations. Also remember to try and keep the width and height of your image as a power of 2 (16, 32, 64, 128, 256,…). Sometimes graphics hardware can’t support non power of two (NPOT) images. In that case SFML will increase the internal storage size for your image and make it a power of 2, thus wasting space. We used a 128 x 128 pixel image, that is a power of two so no problems there. However, what would have happened if the image was 130 x 130 pixels and if NPOT wasn’t supported? The internal texture where the image data would be loaded would have been scaled to 256 x 256 pixels to accommodate the 130 x 130 pixel image.

    With that it’s time to introduce another term, and that term is Texture. In a graphics pipeline a texture is a bitmap (or series of bitmaps),  that can be mapped to an object like a triangle. Mapping a texture to an object is called texture mapping. SFML doesn’t use or expose the term texture or texture mapping in it’s APIs directly (, though it internally does use textures). Instead it just uses the term Image (sf.Image) and gives us a mapped object like a Sprite (sf.Sprite). However, texture and texture mapping are accepted and used terms in graphics. The correct term for image co-ordinates that we saw earlier is actually texture co-ordinates. You will see these terms used very frequently when dealing with graphics. We won’t be getting into the depths of textures in this series since it’s out of scope for a small 2D game like ours. However you will see me use the word texture, texture mapping and texture co-ordinates in later chapters.

    In the next chapter we will see how we manage and automate the loading and sharing of images in our framework.

    Downloads

    • dash_ch7.zip

    [1] – Vector Graphic formats are very often used by artists and content creators to create game related art. Usually intricate and detailed art is created in a vector graphics format and then exported or incorporated into the game pipeline by converting into a raster graphics format. The other place where vector graphics formats are used directly is in flash based games — where most of time the images are vector graphics based.

    [2] – Uncompressed images are very large. Consider a digital image taken by a 12 Mega-pixel camera. Each pixel without transparency in true color is 3 bytes. So the image taken by the camera would become – 12,000,000 x 3 = 36,000,000 bytes i.e. 36Mb. Now consider that you have an 8 Gb card in your camera. So if the image data were to remain uncompressed, you could at the most have 8000/36 = 222.22 or 222 images on your card. In reality because your camera compresses the image file to a .jpg format, you can fit 10 times that amount.

    January 14, 2011
  • A Dash of Game Development – 6. The Event System.

    Now that we have our game framework in object oriented format, it’s time to extend it further so that we can add game entities, load resources and run our game simulations via the framework. Let’s begin by looking at what all needs to be added to our basic game framework. Remember, I am not going to post the entire code from now on. You can refer previous chapters to find out what each function does, or you can refer the full source code posted at the end of this chapter.

    In chapter 3 we briefly talked about Events and Actions. In this chapter we will integrate an event system within our framework. Our entire framework will be event based, so it’s better to get into this now and make it the backbone of our framework. We will call it — well, the Event System. A note I would like to add here is — there are many ways to model a event system each having it’s advantages and disadvantages. We will be using a rather simple but a popular python event system which is easy and concise to implement. The code is as follows –

    class Event():
        '''The Event class.'''
    
        def __init__(self):
            '''Create a list of handlers.'''
            self.handlers = []
    
        def __iadd__(self, handler):
            '''Adds a handler to the list of handlers.'''
            self.handlers.append(handler)
            return self
    
        def __isub__(self, handler):
            '''Removes a handler to the list of handlers.'''
            self.handlers.remove(handler)
            return self
    
        def Fire(self, *args, **keywargs):
            '''Calls all the handlers associated with this event.'''
            for handler in self.handlers:
                handler(*args, **keywargs)
    
        def ClearObjectHandlers(self, obj):
            '''Clears the handlers for a particular object.'''
            for handler in self.handlers:
                if handler.im_self == obj:
                    self -= handler
    
        def ClearAllHandlers(self) :
            '''Clears all the handlers currently associated with the Event.'''
            self.handlers[:] = []
    

    As you can see it’s not too complicated.  An event is modeled as a class that maintains a list of event handlers which it invokes one by one when  fired. The  __iadd__ and __isub__ are overloaded arithmetic operators += and -= that append and remove event handlers to the event handler list. The usage of the class will become clear when we look at an example. Let’s take a scenario from an epic space battle and model two simple classes, one that fires events and other that responds to those events.

    class Captain():
    
        def __init__(self):
            self.ArmWeapons = Event()
            self.FireWeapons = Event()
    
    class StarShip():
    
        def __init__(self, name, captain):
            self.name = name
    
            # bind the captain's events to event handlers
            captain.ArmWeapons += self.OnArmWeapons
            captain.FireWeapons += self.OnFireWeapons
    
        def OnArmWeapons(self):
            print self.name + ' : \"Phasers armed and ready.\"'
    
        def OnFireWeapons(self):
            print self.name + ': \"Firing Phasers.\"'
    

    Here we have two classes Captain and StarShip. The Captain is the controller of the StarShip and it’s but obvious that the ship respond to his events. The Captain has two events — ArmWeapons and FireWeapons, which are connected to the ship’s event handlers OnArmWeapons and OnFireWeapons respectively in the StarShip’s constructor. Let’s check further how the Captain can invoke the StarShip’s event handlers.

    if __name__ == '__main__':
        Picard = Captain()
    
        # let's make Picard the captain of the Enterprise
        Enterprise = StarShip('Enterprise', captain=Picard)
    
        print '\"This is Picard, the captain of the Enterprise. Prepare for battle.\"'
        Picard.ArmWeapons.Fire()
        print '\"This is Picard. Fire at will.\"'
        Picard.FireWeapons.Fire()


    The output of the above code is –

    "This is Picard, the captain of the Enterprise. Prepare for battle."
    Enterprise : "Phasers armed and ready."
    "This is Picard. Fire at will."
    Enterprise: "Firing Phasers."


    As you can see we have 2 objects Picard and Enterprise. The Picard object is an instance of the class Captain and the Enterprise object is an instance of the class StarShip. We passed the Picard object as a captain in the Enterprise’s constructor. The event handlers of the StarShip Enterprise were bound to the events of Captain Picard there. When Picard fired the events, the event handlers of Enterprise were invoked.

    It’s important that you understand the association of the two objects and how the two object communicated via events. Such inter-object communication via events  will be the basis of our game. This is one way interaction, but objects can also communicated both ways via events.

    But what happens if Picard takes charge of more than one ship? Will the same event system work in that case? Well, only one way to find out –

        # Ok, now let's make Picard the commander of 4 more ships
        Voyager = StarShip('Voyager', Picard)
        Defiant = StarShip('Defiant', Picard)
        Excalibur = StarShip('Excalibur', Picard)
        Challenger = StarShip('Challenger', Picard)
    
        print '\"This is Picard, the captain of the Enterprise. I am taking command of all the ships. Prepare for battle.\"'
        Picard.ArmWeapons.Fire()
        print '\"This is Picard. All ships fire at will.\"'
        Picard.FireWeapons.Fire()


    … and the output is

    "This is Picard, the captain of the Enterprise. I am taking command of all the ships. Prepare for battle."
    Enterprise : "Phasers armed and ready."
    Voyager : "Phasers armed and ready."
    Defiant : "Phasers armed and ready."
    Excalibur : "Phasers armed and ready."
    Challenger : "Phasers armed and ready."
    "This is Picard. All ships fire at will."
    Enterprise: "Firing Phasers."
    Voyager: "Firing Phasers."
    Defiant: "Firing Phasers."
    Excalibur: "Firing Phasers."
    Challenger: "Firing Phasers."


    We made Picard the captain of 4 more ships (along with the Enterprise) and all the ships correctly responded to his Events. The event was fired only once, but all the event handlers were invoked. So our event system seems to correctly invoke more than one handlers connected to an event. Fine, let’s move on and integrate it with our framework.

    Since we will be working with a lot of events throughout our game, I chose to create a separate file event.py and put the event code in it. It’s exactly the same code that we wrote for the Event class earlier in the chapter. Along with this there are some changes that need to be made to our GameManager class. As you may recall SFML gives us windows and system events. Unfortunately SFML events are not compatible with our event system out-of-the-box. We need to translate those SFML events into our events — and that will be our first task. First we create the events themselves –

        def Init(self):
            ...
            ...
            self.closeEvent = event.Event()
            self.resizedEvent = event.Event()
            self.lostFocusEvent = event.Event()
            self.gainedFocusEvent = event.Event()
            self.textEnteredEvent = event.Event()
            self.keyPressedEvent = event.Event()
            self.keyReleasedEvent = event.Event()
            self.mouseWheelEvent = event.Event()
            self.mouseLButtonDownEvent = event.Event()
            self.mouseRButtonDownEvent = event.Event()
            self.mouseMButtonDownEvent = event.Event()
            self.mouseLButtonUpEvent = event.Event()
            self.mouseRButtonUpEvent = event.Event()
            self.mouseMButtonUpEvent = event.Event()
            self.mouseMoveEvent = event.Event()
            self.mouseEnteredEvent = event.Event()
            self.mouseLeaveEvent = event.Event()
            self.joyButtonPressedEvent = event.Event()
            self.joyButtonReleasedEvent = event.Event()
            self.joyMovedEvent = event.Event()
            ...
            ...
    

    This is done in the Init() function of the GameManager. Now any game object that wants to receive events can add it’s handlers to these events of the GameManager. But, when do these events fire? They are fired when SFML gives us an event. We do the translation in the function TranslateSFMLEvents, which is the first thing called inside the game loop. The code for that is something like this –

    def TranslateSFMLEvents(self):
    '''Translates the SFML events to Game Events.'''
    sfmlEvent = sf.Event()
    while self.window.GetEvent(sfmlEvent):
        if sfmlEvent.Type == sf.Event.Closed:
            self.closeEvent.Fire()
        elif sfmlEvent.Type == sf.Event.Resized:
            self.resizedEvent.Fire(sfmlEvent.Size.Width, sfmlEvent.Size.Height)
        elif sfmlEvent.Type == sf.Event.LostFocus:
            self.lostFocusEvent.Fire()
         ...
         ...
         ...
    

    (The entire code is available at the bottom of the chapter.)

    If you observe closely, you will see that for some events the Fire function takes arguments. Well the fact is that events are used to communicate information and for some events there is sometimes the need to pass arguments. For example, for the Resize event, new width and height is passed as an argument to the function Fire. Correspondingly every handler attached to that event Resize will receive width and height as arguments. Most events that we will be using and creating, will have arguments in the Fire function. That’s just an easy way to communicate instead of cryptic callbacks.

    We have a long list of events in the Init function of our GameManager. Most of these events will be used later on but for now let’s use the closeEvent to close our window. So our original code for closing the window turns event based into something like this.

        def Init(self):
            ...
            ...
            ...
           self.closeEvent += self.OnClose
           ....
    
       def OnClose(self):
           self.running = False
    

    That’s about it in this chapter. We will be using this event system even with things like Rendering and Updates later on. For now you can fiddle around with the SFML events and see how each of those events are invoked. In our code the GameManager simply prints out the event and it’s arguments.

    Downloads

    • dash_ch6.zip
    January 7, 2011
  • A Dash of Game Development – 5. Going Object Oriented.

    In the previous chapters we finished with the basic outline of a game. However, this simple outline isn’t going to take us too far when it comes to building a complex interactive game. It’s time we added structure to this outline so that we can build it into something that we can actually use to create our game.

    For the sake of reference let me copy paste the outline of the game we have from the previous chapter.

    InitializeGame
    
    while Running :
            CheckForUserInput
            BuildEventQueue
            if Required.Event in EventQueue :
                   TakeAction
    
            UpdateGameEntities
            ClearTheView
            DrawEntities
            DisplayTheBitmap
    
    CleanupAndClose
    

    Most of our pseudo code can be written in the form of discrete functions. To make the out line more OOP friendly, let’s group the functions into a class. We will call this class a GameManager, since it obviously manages the game. We will add more game management functions to it as we progress, but for now let’s focus on what we know. I hope you have a good handle on Python, because I am assuming at least a basic understanding of Python and OOP.

    #!/usr/bin/python
    
    from PySFML import sf
    
    class GameManager():
    
        def Init(self):
            '''Initiates the game and it's resources. All resource'''
            '''loading can be done here'''
            self.window = sf.RenderWindow(sf.VideoMode(800, 600), "Rapid Game Framework")
            self.running = True
            return True
    
        def GameLoop(self):
            '''Starts the Game Loop'''
            while self.running:
    
                # Get the close event
                event = sf.Event()
                while self.window.GetEvent(event):
                    if event.Type == sf.Event.Closed:
                        self.running = False
    
                # Update the game entities
                self.UpdateEntities()
    
                # Clear the screen.
                self.window.Clear()
    
                # Draw all entities.
                self.DrawEntities()
    
                # Display the contents of the bitmap.
                self.window.Display()
    
            return True
    
        def Shutdown(self):
            '''Calls Cleanup function and closes the window and exits the game.'''
    
            # Clean up.
            self.Cleanup()
    
            # Close our window.
            self.window.Close()
            return True
    
        def UpdateEntities(self) :
            '''Updates all the game entities'''
    
        def DrawEntities(self) :
            '''Draws all the game entities.'''
    
        def Cleanup(self) :
            '''Clean up by freeing all entities'''
    
    if __name__ == '__main__':
        mgr = GameManager()
        if mgr.Init() :
            mgr.GameLoop()
        mgr.Shutdown()
    

    The GameManager is a class that has all the functions from our outline. If you have been following the previous tutorials the function and their names must be self explanatory. The __main__ function of out code creates, initiates, runs the GameManager and finally closes and cleans up the game. That was pretty simple, wasn’t it? The only addition to the above outline was the Shutdown function. I’ll get into it in more detail in the later chapters, but for now let’s just think of it as the last step in our game close process.

    The current outline does very little except open and close a window. We will expand it in later chapters. As an exercise you can try adding the scrolling text we had from the previous chapters to this outline. It should be pretty easy.

    As you can well see, the code is getting longer. As we continue, the code will get even longer and span across multiple files. Thus henceforth, for brevity, I will be posting only code snippets in posts and mention only function and class names. Be sure you understand the outline and the code mentioned here. We will be using the same function names and the GameManger class from here on. You can always find the entire code for all the examples at the bottom of each chapter.

    Downloads

    • outline.py
    • scrollingtext.py
    January 2, 2011
  • A Dash of Game Development – 4. Display and Co-ordinate System.

    The previous chapter dealt with the general outline of a game and we saw a basic flow of how a game works. We will slowly add more to that but before we move on, a little bit of theory has be looked into. The reason I want to get into this now, is because as a game developer you ought to have an understanding of display and co-ordinates. We will be using terms and phrases introduced here in later chapters quite frequently.

    Graphics are almost always displayed on any display device via a bitmap also called as a raster graphics image. The bitmap is the more frequently used term of the two and is sometimes interchangeably used with the term image. At it’s very core a bitmap is a data structure having a rectangular grid of color points called pixels. A pixel is the smallest addressable bitmap element, i.e. it is the smallest unit of a bitmap that can be controlled. Every pixel in a bitmap has its own address. The address of the pixel corresponds to it’s co-ordinates inside the bitmap. You can think of a pixel as the tiniest dot inside a bitmap and a bitmap as several rows of these tiny dots (pixels). The image seen on your computer screen is also a bitmap and the computer draws/refreshes it several times a sec (60, 75, 100) depending on the refresh rate of your monitor.

    Since the image displayed your computer screen is in fact a bitmap, most of the the time it is just addressed as a ‘Screen’ instead of a screen bitmap — and that is exactly why the ‘Screen’ dimensions are given in pixels. So if your monitor has the dimensions of 1024 x 768, it means that internally there is a bitmap somewhere of the size 1024  pixels (columns) by 768 pixels (rows) where all the drawing takes place. (Who does the drawing, how the drawing takes place and where the bitmap resides is something we will come to later, but that shouldn’t concern us right now.) Screen dimensions are known as resolutions and because of hardware limitations, monitors can’t (as of writing this) support any arbitrary resolution. There is usually a fixed set of screen resolutions a monitor can support. We will come to that in later chapters when we discuss portability issues.

    Now that we know what bitmaps are, and that a screen is one large bitmap, lets look at the components of the screen that also have bitmaps. Yes, they are the individual windows. Think of it this way, every individual window on the screen has it’s own bitmap. While refreshing the screen, the system GUI draws all the individual window bitmaps (or parts that are visible), composites them into the screen bitmap and displays the bitmap on the monitor. This is probably a very simplistic view of a very complicated flow. The thing that concerns us is the window’s bitmap. That’s where our game contents are drawn and just like the screen, our window’s bitmap is associated with the view contents of the window. We will call this as our game view or simply as ‘View’.

    The view just like our screen, corresponds to a bitmap and it’s dimensions are also given in pixels. In our example (first.py) we create a RenderWindow and give it a video mode of 800 x 600, which tells SFML  to create a View of size of 800 x 600 pixels. The View that is created has it’s origin on the top left corner, i.e. The pixel(0,0) represents the topmost and the leftmost pixel of the view. The rows and columns of the view are considered as axes of the view, with the x-axis representing the the columns and y-axis representing the rows of the pixels. We will call them co-ordinate axes.

    View and Co-ordinate axes
    View and Co-ordinate axes.

    To draw anything on the view you need to tell SFML the location and that is done using co-ordinates. Let’s return back to our code and see how we do our drawing. The functions we are going to discuss are the ones highlighted below.

    #!/usr/bin/python
    
    from PySFML import sf
    
    # Initialize the game components.
    window = sf.RenderWindow(sf.VideoMode(800, 600), "Our First Animation")
    text = sf.String("I am a priece of Scrolling Text")
    x = 0.0
    y = 30.0
    running = True
    
    # Start our Game Loop
    while running:
    
        # Get the input from the player as an event
        event = sf.Event()
        while window.GetEvent(event):
            if event.Type == sf.Event.Closed:
                running = False
    
        # Update the position of our text.
        x = x + 0.3
        if x > 800.0 :
            x = -400.0
        text.SetPosition(x,y)
    
        # Draw the text.
        window.Clear()
        window.Draw(text)
        window.Display()
    
    # Close the window and end the application.
    window.Close()
    

    What do the lines 22 to 25 do? Since we now understand the co-ordinate system, it’s  pretty easy to follow. The code simply sets the position of the text to be displayed (in pixels). For every iteration the x co-ordinate is updated. When the x co-ordinate becomes larger than 800, i.e. goes off the screen, we set the x co-ordinate to -400 so the text snaps back and appears to be scrolling.

    Then we take a look at that the drawing code (lines 28-30). It’s now not difficult to understand what is going on there as well. First, we simply ask the window to clear the View — then we ask it to draw the text, and finally we ask the window to display the bitmap. But why are there 3 functions? Lets first look at the function Draw(). Draw seems to be self explanatory — yes, it does draw the text. However, Draw itself doesn’t show anything on the view. If you were to comment out the line window.Display() (line 30),  you will not see anything at all. Why? Because the draw happens on a bitmap internally but the bitmap itself isn’t shown. The function Display() is the one that flips/swaps the bitmap so that it can be displayed. The function Clear() (line 28) clears the contents of the bitmap before drawing anything. If you were to comment out Clear(), you will see the previous contents along with the new contents. Later on we will get into more details about buffer swapping and things like double buffering. For now let’s keep things a bit more simple.

    Why is Display a separate function from Draw? That’s because a game can have a lot of entities that need to be drawn per frame. Swapping a bitmap is a slow process and ideally should only take place once per iteration of the loop. When there are a lot of entities, you would call a draw on each one before calling Display() only once after all the entities have finished drawing.

    With that information, it’s time to extend the outline of our game to include the draw functions.

    InitializeGame
    
    while Running :
            CheckForUserInput
            BuildEventQueue
            if Required.Event in EventQueue :
                   TakeAction
    
            UpdateGameEntities
            ClearTheView
            DrawEntities
            DisplayTheBitmap
    
    CleanupAndClose
    

    We have finished with our outline. In the next chapter we look at putting this in an object oriented framework.

    December 16, 2010
  • A Dash of Game Development – 3. Basic Outline and Our First Animation.

    I hope your tool chain is all setup right. In that case we move along and actually write some code. We will use the same code from the earlier chapter and add more things to it as we go along. The code does very little as yet, but our short piece of code (first.py) has some important and core concepts that are central to most games. More complex games are built around these basic core concepts.

    #!/usr/bin/python
    
    from PySFML import sf
    
    # Initialize the game components.
    window = sf.RenderWindow(sf.VideoMode(800, 600), "Test Application")
    text = sf.String("Hello Game Development")
    running = True
    
    # Start our Game Loop
    while running:
    
        # Get the input from the player as an event.
        event = sf.Event()
        while window.GetEvent(event):
            if event.Type == sf.Event.Closed:
                # The player wants to quit the game.
                running = False
    
        window.Clear()
        window.Draw(text)
        window.Display()
    window.Close()
    

    Game Loop:

    The first and foremost term to introduce is the game loop. A game loop is just a fancy name given to a looping control flow statement which runs continuously until a boolean condition remains True. In our case the game loop is a while loop and the boolean condition is simply the variable ‘running’. The loop runs as long as running remains True. When running is set to False, the loop exits, effectively ending the game.  As you must has guessed the game loop is where the game action actually takes place. It’s where the shots are fired, enemies are killed swords are slashed and magic is unleashed!

    Input:

    An Input typically occurs when the player/s wants to interact with the game and do so via a input device. An example of an input-device is a keyboard but there are other fancier input devices like Joysticks, Keypads and many more.

    Event:

    Events are what makes a game interactive. An event is not to be confused with input. An input can cause an event, however events are not limited to input alone. There are other instances which can generate events. For instance, in-game interactions between game elements can also generate events. An event can be external or internal is origin. A player pressing a key on a keyboard is an example of an externally generated event. A mine going off because an NPC tripped it’s fuse wire is an internally generated event.

    Action:

    Actions can occur in response to events. For example — If the player pushes the arrow key (event), the in-game player character moves forward (action). Here the player pressing the arrow key generates an event, which executes the move forward action. It is not necessary though that every event generate an action. Sometimes events may generate no action at all and are completely ignored. For instance, a player pressing a key that is not mapped to any action will discard that event and simply not create any action.

    Resource:

    Any data or file required by the game to run and simulate the game is generally called a resource. Images, sound files, data files are all examples of resources. A resource is usually not a piece of code, though it’s not a hard and fast rule. Many games use scripts which may also be considered as a resource. A game can have a large number of resources. A large game can have resources that are several Gigabytes and that number increases with every generation.

    Before we proceed further, lets look at our code (first.py) and see where all these new terms fit in. The program begins with the creation of a window. This is where the game contents will be drawn. PySFML takes care of the nitty-grittys of creating the window and isolates us from unnecessary platform specific issues. After that the ‘text’ and ‘running’ are created and initialized. The point to note here is, line numbers 6-8 in the code serve as an initiation routine for our game. Most games have, and sometimes can have a lengthy initiation process. The initiation process of the game is also the place where the resources of a game that are on the disk get loaded. Reading from the disk or any storage medium is always a slow process and it’s because of this, games usually initialize and load resources before the game loop starts. The ‘Loading…’ screen seen just before the start of a game is where the initiation and loading of resources take place. For very big games where the data per level is in several Megabytes, resource loading can take place on a per level basis.

    Coming back to our code — The Game Loop begins on line 11 and the very first thing we do is check for user input. Again, PySFML abstracts away the input checking code internally and goes a step further by directly building an event queue. All we have to do is check if an event that we are interested in, is in the queue. That is exactly what we do on line 16. We check if the player tried to exit the game by closing the window. If he did, we set running to False. That’s our action in response to an event. The next few lines of code draw the text on the screen, and we will come to drawing and what those 3 statements do in later chapters. For now take my word for it. Also, remember the game loop runs continuously till the player decides to quit, so the things explained in this paragraph happen repeatedly while the loops runs.

    The code in first.py displays a text, but that isn’t what a game is about. A game is usually about moving things, smashing, shooting, colliding. Our current code is no fun! So lets move on then! Yes, we will get to shooting, colliding, smashing later on, but for now lets keep things a bit more simple (for the sake of learning). Lets make the text move, or should I say scroll. Look at the code below. Lets call it (anim.py)

    #!/usr/bin/python
    
    from PySFML import sf
    
    # Initialize the game components.
    window = sf.RenderWindow(sf.VideoMode(800, 600), "Our First Animation")
    text = sf.String("I am a priece of Scrolling Text")
    x = 0.0
    y = 30.0
    running = True
    
    # Start our Game Loop
    while running:
    
        # Get the input from the player as an event
        event = sf.Event()
        while window.GetEvent(event):
            if event.Type == sf.Event.Closed:
                running = False
    
        # Update the position of our text.
        x = x + 0.3
        if x > 800.0 :
            x = -400.0
        text.SetPosition(x,y)
    
        # Draw the text.
        window.Clear()
        window.Draw(text)
        window.Display()
    
    # Close the window and end the application.
    window.Close()
    

    If you run the code above, you will see a scrolling piece of text instead of a static one, and that brings us to the last thing that we introduce in this chapter. The update routine. The update routine updates the game elements. In our case it updates the position of the text, but update is not specific to entity or element position. Our small little update routine starts at line 22 and does nothing but change the position of the text on the screen. However, an entity or an element within a game can update a lot of things including it’s position, state, behavior in an update (as we will see in later chapters).

    Well there you have it! Our small little animation! Now, lets go over the things we have understood from our small animation and build an outline of our game — We start off with Initiation, then we move on and begin our Game Loop. In the loop the first thing we do is check for User Input. PySFML saves us the trouble and gives us Events directly. If there is a quit event, we take the appropriate Action and set our loop state to quit. If not, we Update the position of our text, Draw the text and loop back again to test for user input.

    So our outline will be something like this:

    InitializeGame
    
    while Running :
            CheckForUserInput
            BuildEventQueue
            if Required.Event in EventQueue :
                   TakeAction
    
            UpdateGameEntities
            DrawEntities
    CleanupAndClose
    

    There you go. You have now understood the basic layout of a computer game. Yes, most games even the AAA ones follow this simple outline.

    In the following chapters we will start diving into more complex programming constructs like OOP. We will take this simple framework and make it an Object Oriented one. It will eventually allow us to add more complexity, richer interactivity, more game elements and far more than just one line of scrolling text.

    Note: Games needn’t be modeled using events and actions, but it is often easier and more intuitive to do so. Some games use polling instead of events. Polling is where the game-engine polls inputs instead of receiving events from them. While this works with input, in-game interactions are often cumbersome to design using polling. Whichever way you look at it, (polling or events) it’s still pretty much the same thing.

    Downloads

    1. anim.py
    December 12, 2010
  • A Dash of Game Development – 2. Installation and Setting up.

    In the previous chapter we had a brief introduction of the tool-chain we will be using. Now it’s time to set it up for the game we will be developing. So lets begin by first downloading the individual components.

    Python (version 2.7): http://www.python.org/download/
    PySFML (version 1.6): http://www.sfml-dev.org/download.php
    PyOpenGL (3.0.1): http://pypi.python.org/pypi/PyOpenGL

    Optionally you can also install GIMP, Paint.NET and Notepad++.

    Windows users will generally only need a one click installer, which most of the packages do provide. Most Linux distros will have Python bundled with distribution. If you have a 2.x version, there is no real need to install a separate version.

    Installing PySFML for Windows is just as easy. For Linux and Mac users you need to either download the binaries provided or build SFML (C++) and then build the Python bindings.

    After doing all that, it’s time to test if our setup works.  Open your favorite  text editor and type in the following code:

    #!/usr/bin/python
    
    from PySFML import sf
    
    window = sf.RenderWindow(sf.VideoMode(800, 600), "Test Application")
    
    text = sf.String("Hello Game Development")
    
    running = True
    while running:
        event = sf.Event()
        while window.GetEvent(event):
            if event.Type == sf.Event.Closed:
                running = False
    
        window.Clear()
        window.Draw(text)
        window.Display()
    window.Close()
    

    Save the file as ‘first.py’ in some folder. Open a command prompt navigate to the folder where the file was saved and type in:

    python first.py

    If you can see a window with the words “Hello Game Development” like the one below your installation and setup is correct.

    Our first program.
    Our first program.

    Don’t worry if you don’t understand anything in the code we will get to it later.

    Downloads :

    1. first.py

    December 6, 2010
  • A Dash of Game Development – 1. Introduction and Getting Started.

    This is the first in the series of chapters that should get you started with game development. But before we begin, let me go over some mandatory introductions and how the following chapters will be organized. This is the first chapter and it focuses on what you need to know and what you can do without while following these tutorials. It also tells you the tool-chain you will be using to create a game explained in the coming chapters.

    Though the following chapters are beginner chapters, they are not meant to teach programming. If you don’t have any experience with programming, I am sorry this is not the place to start. It is recommended that you at the very least have some understanding of programming. An advanced level of programming knowledge is not required. If you are not a programmer (yet), don’t worry, this is a good time to start. It’s not all that difficult. You can begin with some simple introductory material like the Non-Programmer’s Tutorial for Python or Dive Into Python then come back here and continue.

    The initial tutorials use Python to introduce game development concepts. No, we won’t begin with languages like C or C++ and there is a good reason for that. Python is easier to understand than C and C++. It will get you into game development faster, allowing you to learn the process of game development rather than fight with language intricacies and unfriendly syntax. C++ will be introduced later and we will briefly discuss how to leverage the power of  C++ and how you can blend scripting languages like Lua and Python with C++ to get the desired performance out of your game.

    All chapters follow a hands-on approach to game development. It is recommended that you write code as you go along with the reading. We will be developing a full game, albeit a small one — enough to make you understand what a game is all about. It should help you understand how modules of a game interact and what is it you need to do to write your own game, fast and simple. We will not be using a game engine per say, but we will be using SFML which stands for Simple and Fast Multimedia Library. It is a platform independent abstraction layer for graphics, input, audio and networking modules. The initial chapters use python bindings for SFML.

    Later chapters also talk about art and art creation. Again, I am not going to go into details of art creation for games. I hope you take some time and familiarize yourself with either GIMP or Paint.NET if you want to create custom art. You can use the art from these tutorials just fine and that should be more than enough to get you through. Learning how to create game art is not really necessary for these tutorials.

    There is no need for fancy IDEs or text editors. For Windows users I would recommend Notepad++ but your simple notepad, vim, emacs or whatever will do just fine. Most of the code presented will be cross-platform compatible and should run on systems where the libraries and tool-chain mentioned is available. Getting the code to work on Win32, Linux, Mac OS shouldn’t be a problem.

    Tool-Chain:

    • Text Editor. (Notepad++, vim, emacs, etc.)
    • Python 2.7.
    • PySFML.
    • PyOpenGL. (Python OpenGL bindings used in later chapters.)
    • Image Editor. (GIMP, Paint.NET, etc.)

    More libraries and tools will be added to the tool-chain as we progress. For the initial few chapters, this is all you are going to need.

    (A note on Python 3.x. As of writing this tutorial, there were some problems encountered while assembling a Python 3.x tool-chain. Many modules and libraries were not available for Python 3 or had to be compiled from scratch, leading to a lot of difficulties. Unfortunately I had to stick to Python 2.7, but I am sure porting code to Python 3 later on won’t be too difficult.)

    December 5, 2010
1 2
Next Page→

Rapid Game Builder

Proudly powered by WordPress